Friday, November 19, 2010

Cranberries and sugar
Marshmallows and whipping cream

The finished salad(sorry my pictures aren't prettier)

I'm sure many of you are planning your Thanksgiving dinners and I wanted to post this recipe before it was too late to add to your menu. It is one of my favorite recipes and is special because it came from my Grandma. The tartness of the cranberries and the sweetness from the marshmallows, along with the whipping cream make it so delightful. I have shared this recipe over the last several years and many friends have told me it has become a must at their Thanksgiving tables. If you make it, tell me what you think. I hope you enjoy it as much as our family does!


Granner's Cranberry Salad
1/2 lb. Cranberries (ground very fine)
3/4 cup sugar
1/2 pint whipping cream, whipped until stiff peaks form
small pkg. marshmallows
1 small can crushed pineapple
Mix sugar and cranberries together. Put in refrigerator for 2 hrs. Mix whipped cream and marshmallows in seperate bowl and chill in refrigerator for 2 hours. After 2 hours is up take out of fridge and combine all ingredients and add crushed pineapple. Mix thoroughly. Put back in refrigerator and let chill overnight.
Wednesday, November 17, 2010

Christmas gift #5 - Christmas Planner


So I hosted my card club last night and we made these darling Christmas Planners. I saw the idea on http://www.twopeasinabucket.com/. They are made from a file folder, we covered in paper and embellishments and then antiqued the edges. There are different pockets for notes, receipts and lists. I don't know how practical they are, but I thought they were super cute. You could give this as a gift to friends or sisters before Christmas and even include a gift card for shopping. I know I could use a little organization at this busy time of year and why not do it with some style!!

Tuesday, November 16, 2010

Christmas tree decorations


So call me crazy, but I like to do a tree in each of my little birds' rooms and they all match their decor. I found the trees super cheap after Christmas one year and also the ornaments. the birdies love them and think they are so special to get their own tree. This year I saw a new cute ornament idea and was about to buy them and then saw the tag. They were about $7.00 a pick. All it is is pipe cleaner twisted in a curly q and then we put a bead on the end. We then twisted 3 to a long pipe cleaner and twisted them together. They were simple and my girls had a blast making them with me. I probably did around 30 for about $2.00 or $3.00. I think they add some fun quirky style to their trees. I actually decided to do some silver with reds beads for my tree. It sure got me in the Christmas spirit! Can't wait!!

Saturday, November 13, 2010

Christmas Gift idea #4 - Christmas sign


I decided to copy my Thanksgiving sign and do a Christmas one. I had been looking at some other blogs that I love and saw a cute Christmas sign with just a bunch of different Christmas words. The blog is http://www.eighteen25.blogspot.com/. They have way cute ideas and they also offer free printables all the time. Anyways, I made up my own sayings on the computer, chose different font and different font colors and then printed it out. I wish I was good with photoshop because you could probably do it a lot better on there, but I'm still learning. After doing that I glittered just a few of the letters to give it some bling. I then mounted it to cardstock and added some holiday bows. This sign I actuallly mounted on an old corkboard that I had pulled from my husbands office. It has been sitting in my craftroom and thought it would be fun to mount on that and have the silver show off the edges. I just cut my paper to size and taped it on. Then like the other board I put ribbon on the back to hang. This project literally cost me nothing, because most everything I used was in my craft room. If you don't have old boards lying around you could just go to home depot and have some cut for quite cheap. I think they would be great gifts for teachers, neighbors or just for yourself to hang in your home.

Thursday, November 11, 2010

Christmas idea #3 - Christmas pillow cases


If your anything like me you are really starting to think about all those Christmas gifts you've got to buy. The big day is right around the corner and I thought today I would share a simple homemade Christmas gift idea with you. A few years ago I decided to make all my friends and their families pillow cases. It was quite an undertaking since I had to make about 30. But these really are simple and fast. Last year I made my girls some for their beds. I found this darling fabric at a local fabric store. I just measured a regular pillow case. I think I bought about 3/4 yd to 1 yd. Then you just sew up the sides and turn over top and stitch around to make the border. These ones for my girls I put a different fabric around the top. I think it adds a little extra to the pillow and I got to use more of the cute fabric line I found. I think they make a darling inexpensive gift for friends, neighbors and family.

Monday, November 8, 2010

Thanksgiving sign


I was able to go home this weekend to Boise and spend time with my family. My sisters and I hit a barn sale while we were there on Friday. It was the Fancy Farm girls sale. I found out about it through there blog, http://www.fancyfarmgirls.blogspot.com/ and if you live in Boise you should find out when the next one is. The stuff is all shabby chic and is great prices. They said people were lined up at 10:00 that morning. While I was there we also did some fun crafts. My sister showed us how to make this cute wood Thanksgiving board. We took a 12x12 piece of plywood sanded and painted it a desired color. Next we took scrapbook paper and cut a scalloped edge around it, about 10x10 size and mounted it with modge podge onto the board. Then we printed out blessed on the computer on cardstock and cut it about 8x8. We then modge podged it onto the scrapbook paper. To finish, we covered the whole thing with modge podge and tacked ribbon to the back to hang. I know we all probably have lots of signs in our homes, but this one was really easy and I thought it would make a great Christmas gift too. You could do it in Christmas colors and print Joy, Holly, Deck the the Halls, etc.

Wednesday, November 3, 2010

Christmas idea #2 - aprons


Last year I decided to make my sisters aprons. Keep in mind I am not the best seamstress. I know that I wanted to do the ones with the ruffles and I also wanted to incorporate my Grandma's vintage pillowcases. They have crocheting along the bottom that is so detailed and beautiful. I started looking on some blogs and found some patterns for the ones I wanted. I would love to be able to tell you where I found them and what the dimensions were, but I didn't keep them. They ended up being quite easy and I made 3 all in one day. They turned out super cute and mys sisters loved them so much. I think they have actually hung them in their kitchens as decor instead of using them. I think this is a great idea for a gift. You could maybe add a cookie mix and cookie cutters or a new rolling pin to go along with it. The perfect gift for the cook in your life!

Tuesday, November 2, 2010

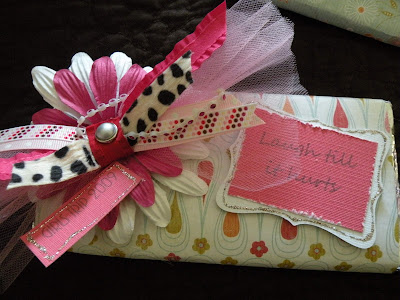
Christmas idea #1 - embellished candy bar


I know it seems a little early for Christmas ideas, but really it is less than two months away and if you are planning on doing any homemade gifts now is the time to start. I thought over the next few weeks I would post some of my ideas for gifts. I actually made these gifts for my sisters for our girls trip last year, but you could easily turn them into christmas gifts. I think they would make cute teacher gifts, neighbor or girlfriend gifts, or cute stocking stuffers.


What you need:


giant candy bar - hershey or symphony is what I like

scrapbook paper

double sided tape

flower and ribbon for embellishments

glue sticks and glue gun

First you take off the original wrapper and use it to measure you paper. Cut out paper and wrap around candy bar. Secure with double sided tape. Then take a bunch of ribbons and cut them about 3-4 inches long. (I like to use tool and even stips of fabric.) Then wrap another ribbon around the bunch and tie in the back. I then used my glue gun to adhere my flower to the ribbon and then adhered the ribbon to the candy bar. You can also embellish with cute sayings or tags. The possibibilities are endless with this idea and you can use them for pretty much every occasion.

Thanks Sign


I got out my Thanksgiving decor today and thought I would share a craft project I did a few years ago. We have a great store here in Utah called The Wood Connection. They have all sorts of unfinished wood projects you can by and finish yourself. One thing they have are all sorts of sayings and letters. I bought my thanks in a kit and then painted them. If you don't have access to this store I am sure a lot of local craft stores have them. One thing that makes this project unique is the fun glitter.


I first sanded the letters and then painted each one a different color. When they were dry I sanded the edges and stained it with an antiquing gel and then wiped off immediately with dry cloth. Once that was dry I sprayed with a shiny lacquer spray paint and then glittered every other letter. I used the Martha glitter in the same color as my paint. There is also a glitter I like that is for scrap booking. I think it is cuddle bug designs or something like that. The lacquer makes it stick and once that was dry I gave it another coat of the lacquer. I love how it turned out and how it sparkles!

Monday, November 1, 2010

Fall Breakfast Foods

Pumpkin pancakes with Buttermilk syrup

Finished!!

Flatten on Parchment


Add wet ingredients


Crumb mixture


I have two recipes to share with you today. I actually made both of them yesterday and they were quite delicious. The first recipe is from my friend Cami and was a huge hit for breakfast. The second came from a friend of mine, Amelia and is something I have to make every fall.


Pumpkin Pancakes with Buttermilk Syrup


Pancakes:
2 eggs
1 1/4 cup buttermilk
4 T. oil
5 T. pumpkin
1/4 c. sugar
1/4 tsp. salt
1 1/4 cup flour
1/2 tsp. baking powder
1/2 tsp. soda
1/4 tsp. cinnamon
1/4 tsp. allspice

Mix eggs, buttermilk, oil, and pumpkin in mixing bowl. Add: sugar, salt, flour, b. powder. soda, cinnamon, and allspice.Beat until smooth. Grease skillet and pour about 1/4 cup of batter onto hot skillet. Flip.


Buttermilk Syrup:
1 stick butter
1 cup sugar
1/2 cup buttermilk

Bring all ingredients to a boil and remove from heat. Add 1 tsp. vanilla and 1/2 tsp. soda. Stir well. Serve over hot pancakes. Yummy!!


Tip: I did not have any buttermilk on hand, so I made my own by mixing 1 cup milk with 1 T. lemon juice. Let it sit for about 15 minutes until it thickens slightly. It worked great!


Pumpkin Scones with Cranberry butter


2 1/4 cup flour
1/4 cup brown sugar, packed
2 tsp. baking powder
1 1/2 tsp. pumpkin pie spice add extra cinnamon and nutmeg (if you want)
1/4 tsp. salt
1/4 tsp. soda
1/2 cup cold butter
1 egg
1/2 cup canned pumpkin
1/3 cup milk


Combine dry ingredients in mixing bowl and cut in butter until course crumbs form. Wisk egg, pumpkin and milk together and add to crumb mixture until moistened. Knead ten times, or until all is fully incorporated. Turn out on parchment paper or greased cookie sheet. Press into an 8 inch circle. Bake at 400 degrees for 12-15 minutes. Cut into wedges with pizza cutter. Serve with cranberry butter.


Cranberry butter
1 cube butter
1/2 tsp. cinnamon (or to taste)
1/4 cup crown sugar
1/4 c. -1/2 cup branberry jelly

Mix together in blender until creamy and smooth. (I also love to make this for Thanksgiving to serve with homemade rolls).

pinterest

Followers